Installeer de app
How to install the app on iOS
Follow along with the video below to see how to install our site as a web app on your home screen.
Opmerking: This feature may not be available in some browsers.
Je gebruikt een verouderde webbrowser. Het kan mogelijk deze of andere websites niet correct weergeven.
Het is raadzaam om je webbrowser te upgraden of een browser zoals Microsoft Edge of Google Chrome te gebruiken.
Het is raadzaam om je webbrowser te upgraden of een browser zoals Microsoft Edge of Google Chrome te gebruiken.
Af! Overheating in the desert North Afrika 1942 ( Italeri kit 1:35 scale).
- Onderwerp starter Gérard Deygas
- Startdatum
Dit model is af!
Gérard Deygas
🇺🇳 Niet Nederlandstalig
Hello Paul,
No I didn’t know😉
No I didn’t know😉
Gérard Deygas
🇺🇳 Niet Nederlandstalig
The North African climate puts a strain on equipment, long journeys sometimes up to 1500 km to supply the front deteriorate vehicles. As much for mechanics as for bodywork. To reproduce its wear effects, I use the base shade applied with a brush pure or slightly diluted on certain parts. We obtain honorable results like here on the rear body.


Gérard Deygas
🇺🇳 Niet Nederlandstalig
We will imagine that after a very tiring long distance, a night drive to avoid the British hunt, the refueling finally arrives. Nourritue, fuel, water, various materials... the essential to continue the fight. The bodies sweat .... the heat is overwhelming.... At our place in France and in our department of Gard, it’s the same thing right now!!!!


Bert van Wiltenburg
Lid van de TWENOT
- Interesses
- Vooral modern, heb veel IDF, wat US, NL, DE, GB en SU modellen klaar staan om te bouwen.
- Schalen
- 1:35
- Nu bezig met
- 9 lAV's van Esci, Italeri en Trumpeteer, zijn inmiddels klaar, nu met 15 voertuigen voor een IDF dio
Did you give the arms and legs a gloss coat to create the sweat?
Gérard Deygas
🇺🇳 Niet Nederlandstalig
I applied a satin polish with a flat brush. Well stretched the varnish with the help of the brush

Peter van Dijk
Lid van de TWENOT
- Interesses
- WW2 in Europa
WW1 Gevleugeld Oorlogstuig
What If, SciFi, Fantasy
- Schalen
- Waar ik maar zin in heb
- Nu bezig met
- Tamiya Schwimmwagen 1:35
I've never seen sweaty skin like this (on miniatures).. it does look very convincing 👍
I've read about the heat in France and Spain.... it is creaping up North and heating up Netherlands as well right now 😅 Hang in there ! 🧊🧊🧊
I've read about the heat in France and Spain.... it is creaping up North and heating up Netherlands as well right now 😅 Hang in there ! 🧊🧊🧊
Laatst bewerkt:
Gérard Deygas
🇺🇳 Niet Nederlandstalig
One could even imagine that one of the crew members of this Opel Blitz using a stencil is painting on one of the doors the palm tree emblem of the AFRIKAKORPS...😉

- Interesses
- Pantservoertuigen, vnl. WOII t/m Golfoorlog
- Schalen
- 1:35
- Nu bezig met
- Medium Tank T6
That is a very good addition, and not something you see a lot in dioramas 🙂
Gérard Deygas
🇺🇳 Niet Nederlandstalig
Yes, I like to reproduce attitudes that we don’t see often enough
Gérard Deygas
🇺🇳 Niet Nederlandstalig
The sand acts as a powerful sandblaster, abrasive during storms it damages paint and mechanics
*


*
Gérard Deygas
🇺🇳 Niet Nederlandstalig


Alain Tisseire
🇺🇳 Niet Nederlandstalig
Hi Gérard,
I feel like I'm reading the Opel Blitz's technical manual.
Very nice work.
I feel like I'm reading the Opel Blitz's technical manual.
Very nice work.
Gérard Deygas
🇺🇳 Niet Nederlandstalig
Hi Alain
Thank you for your appreciations.
Thank you for your appreciations.
Gérard Deygas
🇺🇳 Niet Nederlandstalig
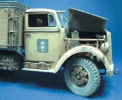
For the rims and tires, I decided not to use those present in the kit. A very bad experience with a Horch Kfz.15 from the same manufacturer having dissuaded me. After a few years I discovered the rims “eaten” by the rubber of the tires!!! A chemical reaction between the rubber and the injected plastic. Damage unfortunately irreversible... To avoid this misadventure, I chose to equip my Blitz with resin wheels. Today disappeared my choice had been made on the French brand PSP. They have never moved since. To represent a slightly under-inflated tire, I sanded the part in contact with the ground on a sheet of medium-grain sandpaper. Don’t forget to place the tire valve. At this point, they are not yet installed.


Gérard Deygas
🇺🇳 Niet Nederlandstalig
With the long distances to refuel the front, the troubles follow one another for the convoys. Mechanical breakdowns are frequent, most vehicle engines are not equipped with filters for sand dust and obstacles related to terrain difficulties are common... areas of soft sand ensable vehicles delaying their Stuck in the sand, my Blitz is going to have trouble reaching its diorama !!!


Peter van Dijk
Lid van de TWENOT
- Interesses
- WW2 in Europa
WW1 Gevleugeld Oorlogstuig
What If, SciFi, Fantasy
- Schalen
- Waar ik maar zin in heb
- Nu bezig met
- Tamiya Schwimmwagen 1:35
The plot thickens 😬............ i cross my fingers for the Opel and her crew 🤞😎🤞
Maarten Weers
Lid van de TWENOT
- Interesses
- Britse leger 1944
- Schalen
- 1:35
- Nu bezig met
- RAM MkII Kangaroo
Nice effect. Do not forget to put a lot of sand between the different components of the truck. Sand goes everywhere.
Gérard Deygas
🇺🇳 Niet Nederlandstalig
Other photos of the Opel Blitz taken from different angles. I will talk to you soon about the loading of the truck.


Gérard Deygas
🇺🇳 Niet Nederlandstalig
The loading consists of fuel drums, water jerrycans, a crate containing equipment and two wooden sleepers. Essential parts to be able to unload the fuel drums. Like the extra spare wheel.


Gérard Deygas
🇺🇳 Niet Nederlandstalig
The main loading of our truck are barrels of fuel. Subjected to harsh tests with repeated loading and unloading, rolled on the ground, dragged they present a well-damaged paint! It is necessary to restore this aspect which reveals paint chips, various traces etc... For this I have already mentioned, I use a stamp to clean the pots. But before that, you need to paint the barrels... I chose two colors, a very dark green Humbrol 75 and Humbrol 93 sand with added Revell white matt 5. After painting the base, a black candle wash is applied (dilution with white spirit). Once dry, sand pigment is deposited, then the excess is removed with a second clean brush. The strapping of the barrel receives a mix of Lamp Black Winsor and Newton +Revell 78 + Burnt Sienna Winsor and Newton. For impacts and other traces, I used the same mixture in an aluminum container, further diluted with white spirit. The scotchbrite stamp piece is dipped in this mixture and applied to the desired parts. The center of the largest shards painted with a brush.. The metallic aspect of the straps is made with a pencil lead.


Gérard Deygas
🇺🇳 Niet Nederlandstalig
the sequel...there was no more room!!!
The main loading of our truck are barrels of fuel. Subjected to harsh tests with repeated loading and unloading, rolled on the ground, dragged they present a well-damaged paint! It is necessary to restore this aspect which reveals paint chips, various traces etc... For this I have already mentioned, I use a stamp to clean the pots. But before that, you need to paint the barrels... I chose two colors, a very dark green Humbrol 75 and Humbrol 93 sand with added Revell white matt 5. After painting the base, a black candle wash is applied (dilution with white spirit). Once dry, sand pigment is deposited, then the excess is removed with a second clean brush. The strapping of the barrel receives a mix of Lamp Black Winsor and Newton +Revell 78 + Burnt Sienna Winsor and Newton. For impacts and other traces, I used the same mixture in an aluminum container, further diluted with white spirit. The scotchbrite stamp piece is dipped in this mixture and applied to the desired parts. The center of the largest shards painted with a brush.. The metallic aspect of the straps is made with a pencil lead.


The main loading of our truck are barrels of fuel. Subjected to harsh tests with repeated loading and unloading, rolled on the ground, dragged they present a well-damaged paint! It is necessary to restore this aspect which reveals paint chips, various traces etc... For this I have already mentioned, I use a stamp to clean the pots. But before that, you need to paint the barrels... I chose two colors, a very dark green Humbrol 75 and Humbrol 93 sand with added Revell white matt 5. After painting the base, a black candle wash is applied (dilution with white spirit). Once dry, sand pigment is deposited, then the excess is removed with a second clean brush. The strapping of the barrel receives a mix of Lamp Black Winsor and Newton +Revell 78 + Burnt Sienna Winsor and Newton. For impacts and other traces, I used the same mixture in an aluminum container, further diluted with white spirit. The scotchbrite stamp piece is dipped in this mixture and applied to the desired parts. The center of the largest shards painted with a brush.. The metallic aspect of the straps is made with a pencil lead.
Gérard Deygas
🇺🇳 Niet Nederlandstalig
With these last photos this thread ends. The crew of my Blitz consists of 2 figurines from MK35, the brand no longer exists today, the team has retired. The emblem of the D.A.K, the palm tree, was taken from a Verlinden board. I really appreciated our exchanges. See you soon for a new
thread.

 .
.
.
thread.
..
- Interesses
- Pantservoertuigen, vnl. WOII t/m Golfoorlog
- Schalen
- 1:35
- Nu bezig met
- Medium Tank T6
That is a very good-looking model, it really gives the impression of being in the heat of the desert 🙂
BTW, I’ve added the prefix “Af!” (meaning “Done!”) to the subject to show that the model is finished.
BTW, I’ve added the prefix “Af!” (meaning “Done!”) to the subject to show that the model is finished.
Gérard Deygas
🇺🇳 Niet Nederlandstalig
Thank you Jakko and see you soon
Peter van Dijk
Lid van de TWENOT
- Interesses
- WW2 in Europa
WW1 Gevleugeld Oorlogstuig
What If, SciFi, Fantasy
- Schalen
- Waar ik maar zin in heb
- Nu bezig met
- Tamiya Schwimmwagen 1:35
I am glad the crew and Opel survived to ride another day 😉
Nice blog Gérard 👍 and about the next one ?.... bring it on 😃
Nice blog Gérard 👍 and about the next one ?.... bring it on 😃
Gérard, I have always enjoyed your books back in the 90's/2000's and enjoy your builds here on the forum just as much......please keep them coming.
Another thing I love is that you (like me) still use Humbrol and Revell Enamels, oil paint and relative simple techniques. It goes to show that one doesn't always need to spend hundreds of Euro's to reach a good result.
Another thing I love is that you (like me) still use Humbrol and Revell Enamels, oil paint and relative simple techniques. It goes to show that one doesn't always need to spend hundreds of Euro's to reach a good result.
Gérard Deygas
🇺🇳 Niet Nederlandstalig
Thank you very much for your appreciations. Through my different subjects I have always wanted to offer products that are simple to use and easy to get hold of, which are often more effective than some expensive products for painting kits. I have never changed my way of doing things since I started making models and I keep these good habits that work very well. I just finished 2 models at 1/16 and despite the change of scale I keep the same working technique 😉
Well done, in all aspects. Thanks very much for charing it here.
Gérard Deygas
🇺🇳 Niet Nederlandstalig
👍 👍😉